
Somebody ask me: “Hey! Does JMeter support for test Mobile Web or Mobile Application?”. If you were me, How would you answer this question? I bet a lot of you will not know the answer to this question until reading this post (just kidding :D). This is very simple, for the Performance Testing, we usually test for the Server Side, and JMeter will be used for simulating the Client Side, send the requests to Server. The Web browser is a Client, and of course, Mobile Application is also a Client. We know the way which Mobile App send the requests, then we will simulate them in the JMeter. So, the answer is: Yes.
For the Web in Desktop, we can easily create the Test Plan by Record Tests with JMeter. But it might a little bit harder in Mobile Application. We need to do some more steps before recording the traffic in Mobile. Follow the guide of this post, I will show you fully step by step to do this.
Note: This post is applicable from JMeter 3.0 or higher. The older version might not work properly.
1. Preparation
1.1 Network
– Connect your PC and the Mobile device to the same Network (prefer using Wifi).
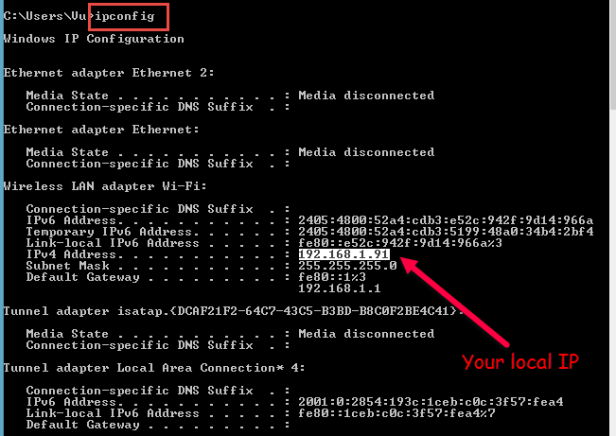
- Check your local IP address:
- Windows: open
cmd(Window + R) and type the commandipconfig
- Unix (MacOS, Linux, etc.): open
terminaland type the commandifconfig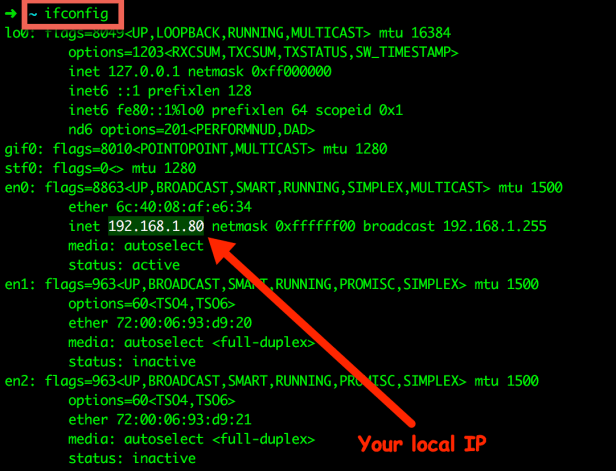
Please remember this IP, we will use this later. In my post, I will record on my MAC, so I will use the IP 192.168.1.80.
1.2 JMeter
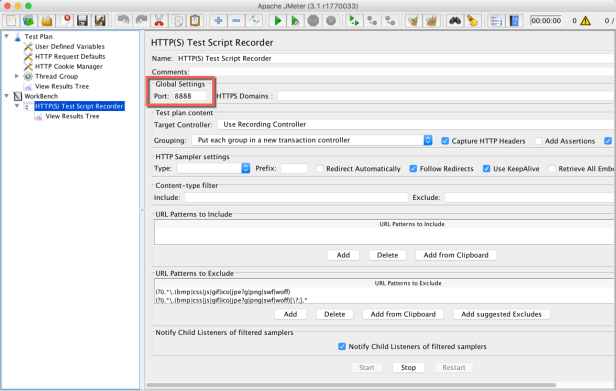
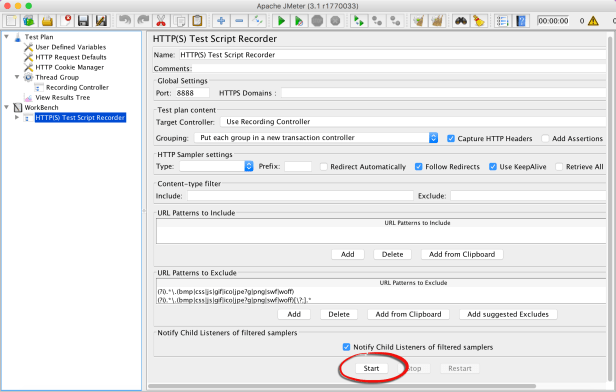
Please refer Step 1, Step 2 and Step 3 in the post Record Tests with JMeter to create an HTTP(S) Test Script Recorder in JMeter. I still use the Port 8888 for this record
1.3 Certificate
Go to $JMETER_HOME/bin directory, find the ApacheJMeterTemporaryRootCA.crt file. If you cannot find this file, please go back JMeter, in HTTP(S) Test Script Recorder, just click Start button at the bottom of this page, it will generate the certificate file automatically. Then Stop it, we will enable it later, after complete the configuration below.
Write an email, attach the certificate file, and send it to yourself. We will open this email in the mobile device.

Note: Please make sure the certificate file is not expired. You can check by double clicking in the .crt file, and see the information like below
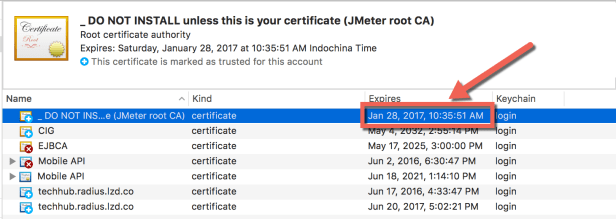
If it was expired, please re-generate the new file before attaching and sending the email.
2. Mobile Configuration
2.1 Android
Step 0: To install the certificate in Android device, you must setup Lock Screen using Pattern, PIN or Password. Refer this link to know how to setup screen lock.
Step 1: Open Email application in Android device, and check the email which was sent above.

Step 2: Download the certificate file ApacheJMeterTemporaryRootCA.crt, then install by tapping on this.

Step 3: In the pop-up Name the certificate (JMeterVN Demo for example), input any name for the cert. If it displays the default name, you can just leave it by default. Select VPN and apps in drop-down list Credential use:

Click OK once completed inputting. You will see the toast at the bottom of screen JMeter VN Demo is installed

Step 4 (Optional): Kindly note that this step is optional, just for your information, or you can just ignore the notification and go to next step.
After installing successfully, you will see the notification Network may be monitored

Tap on this notification, the Network monitoring pop-up will be displayed

Tap CHECK TRUSTED CREDENTIALS will lead you to Trusted credentials page

Open the credential, it shows the information of the JMeter cert which we just installed

One more time, you can ignore checking in this step 🙂
Step 5: Open Wifi Settings, focus on the connected network (remember, it should be the same network with your computer)

Tap and hold on this network, and tap Modify network on the opened pop-up

Step 6: Modify network pop-up is opened, check the checkbox Advance options and select Manual in Proxy drop-down list

Step 7: The proxy configuration is shown. Now we will config the proxy with the Proxy hostname is the local IP which we found in section 1.1 Network. In my post, it should be 192.168.1.80
For the Proxy Port, it must match with the Port in HTTP(S) Test Script Recorder of JMeter. I mentioned this Port in section 1.2 JMeter above.

Click SAVE to complete the configuration.
Now we’re ready to record the traffic in Android Device.
Note: I’m using Sony Xperia XA Ultra with Android 6.0. It might different in other Android devices, but almost the step will be the same.
2.2 iOS
I’m using iPad Air for my post.
Step 1: Open Mail application on your iOS device. It must be the native Mail app ![]() on iOS, the other app like Gmail might not work properly. Check the email which was sent in section 1.3 Certificate.
on iOS, the other app like Gmail might not work properly. Check the email which was sent in section 1.3 Certificate.

Step 2: It will lead you to the Profile Setting to install the certificate. Tap Install at top right corner of the pop-up

The password may be required

Just a Warning pop-up will be shown to let us know which will be install. Tap Install at top right corner of the pop-up again.

One more step, tap Install on the last confirmation

After installation successfully, it will show you the pop-up Profile Installed and you can see the sign Verified ✓. Tap Done to complete the installation.

Step 3: Open Wifi Settings, select the current connected Wifi, tap on this Wifi to go to the detail.
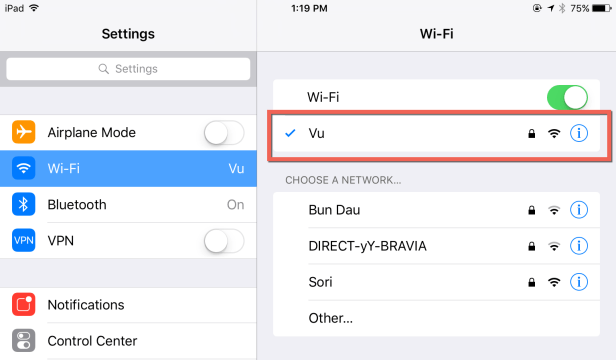
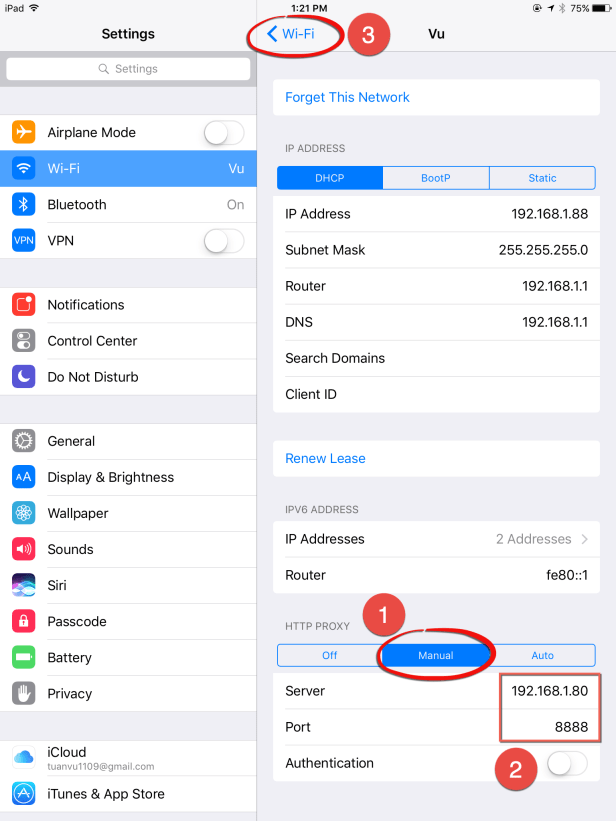
Step 4: Observe the bottom of the Wifi Detail, you can see HTTP Proxy area. Tap Manual, input the Server (is the local IP which we found in section 1.1 Network) and the Port (is the local IP which we found in section 1.1 Network). In my post, it should be 192.168.1.80. Then tap Wi-Fi, go back Wifi Settings to complete the configuration.
Now we’re ready to record the traffic in iOS Device.
3. Record
On your device, open any web browser and try to access any website, like jmetervn.com.
Oops, you cannot connect to the internet, and see the error like that:

Don’t worry, you did correctly all things until now. It causes by the Proxy was not started in JMeter. It’s time to go back JMeter with our Test Plan for Recording.
Next, I open Chrome browser on my Android device and access 3 page in order:
– Home Page JMeterVN
– Blog Post: How to Record Mobile Application
– Blog Post: Building a Basic Web Test Plan JMeter
Note: I used this pattern in URL Patterns to Include
jmetervn.com.*
Let see what I get in the Recording Controller

You can see, now I can record the traffic through the Mobile Web.
Next, I tried to record an Application. For example: LinkedIn, go around in the application, like checking the Notification and go to Home, then go to the detail of one LinkedIn post.
And this is the result I get in Recording Controller in JMeter
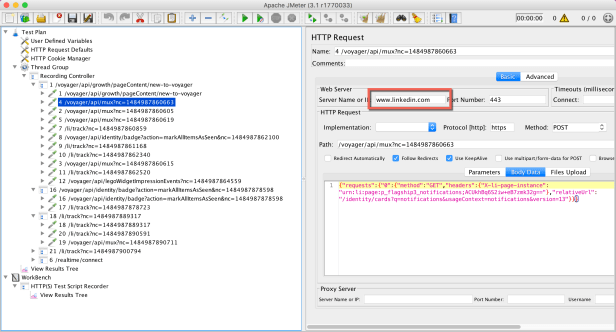
As you see, not only the Mobile Web but also the Mobile Application, as long as it uses the HTTP(S) Request to communicate between Client and Server, then JMeter can capture it.

Thanks admin,
I did all step above but I can’t record. In my mobile device it has notify: Can’t connect to this page. And Jmeter didn’t record anything.
Please help me
I use: Sony Experia
LikeLike