
1. Timer
1.1 Context
First of all, I would like to recommend you to watch the two GIF below:


GIF 1 represents the default of JMeter, all requests will be sent without pausing between them. This might cause server overload easily by making too many requests in a few seconds.
You know, in the real life, the users don’t visit the website at the same time and they will not do the actions continuously. They need some time to wait for the page load, take a look at the page content before going to the next step/action. I.E. When a user is staying at Register page, he/she might take a few minutes to complete inputting the information and then click the Submit button. Another example, a user go to the post A, reading the content in few second before going to the next post.
So users will do the action at different time intervals, between each request must have a delay time. In the world of load testing, this delay is known as User’s Think Time.
Through the context above, while developing Test Plan in JMeter, we should not let it run the test by default, instead, we need an element which helps to mimic the real time behavior. It’s TIMER.
- Timers can help to simulate a virtual user’s “think time”.
- Timers allows JMeter to delay/pause between each request which a thread makes.
1.2 Rules
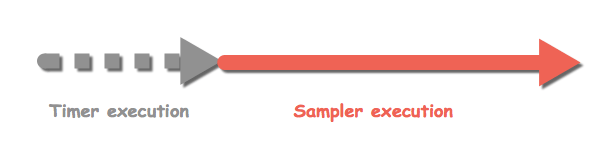
Rule 1: The Timers are executed before the sampler’s execution but after the PreProcessor
Rule 2: Timer is applicable for all sibling and child element. Or applicable for only one parent sampler.
Example 1: 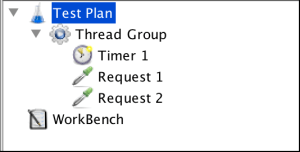
Timer 1 is applied to Request 1 and Request 2 (sibling elements with the Timer)
Example 2: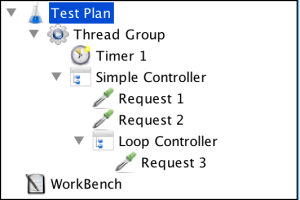
Timer 1 is also applied to Request 1, Request 2 and Request 3 in this case.
Example 3: 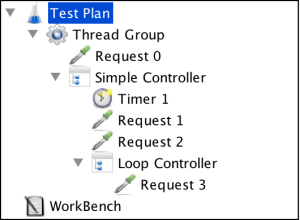
Timer 1 is NOT applied to Request 0 because of that sampler is upper level compare with the timer
Example 4: 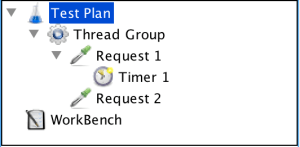
Timer 1 is ONLY applied for the Request 1, NOT the Request 2. Remember that, if the timer is under a sampler, it will be applied to that sampler ONLY.
Rule 3: If there are many timers applied for a sampler, then the pausing time for that sampler will be equal to the sum of all timers.
Example: 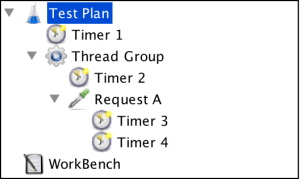
In this case, time delay time before executing the Request A is the total time of Timer 1 + Timer 2 + Timer 3 + Timer 4
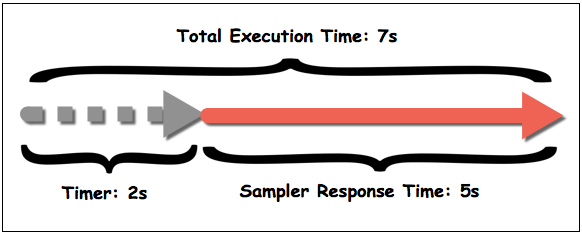
Rule 4: The response time of the sampler does not include the execution time of the Timer.
Example: The Sampler take 5 seconds long to execution, and it has Timer 2 seconds. That means the total time to run for this test is 7 seconds. But the Response Time of the sampler is still 5 seconds.
NOTE: in case you want to include the timer execution into the response time as well, put them all under the Transaction Controller.
2. Constant Timer
There are many timers provided in JMeter: Constant Timer, Gaussian Random Timer, Uniform Random Timer, Synchronizing Timer, etc. In this post, we just focus to the Constant Timer because it’s the simplest one in my opinion.
The purpose of Constant Timer is to pause for the same amount of time between requests from each thread.
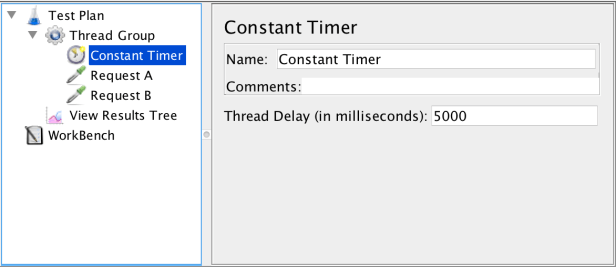
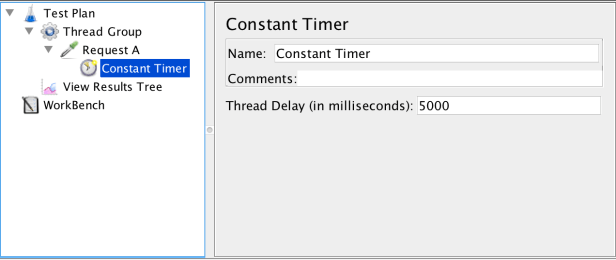
This is the Constant Timer config panel:

There’s only one parameter in this Timer: Thread Delay (in milliseconds). It’s Number of milliseconds to pause. For example, The above configuration will add a 300ms delay before the execution of each sampler.
If you want to pause 5 seconds, input 5000, or 1 minute, input 60000, etc.
Let’s refer some cases below to see how the Constant Timer work in detail.
2.1 Apply for all requests
If all your requests must have the same the delay time, you can consider using the Constant Timer in Thread Group level. Refer the Test Plan below
This is the result when running the test
2.2 Delay before running sampler
While running the request A, you want it to wait for 5s before executing. Let’s put the Constant Timer under that request, and set the Thread Delay (in milliseconds) = 5000.
The Test Plan looks like:
Run this test and see how it works:
2.3 Delay after running sampler
Sometimes you will need the test pause amount of time after running the specific request. In that case, you should put the Constant Timer under the next request. It looks like:

Actually, this one is exactly the same section 2.2 above. It’s just different way and purpose to use it.
Look at the GIF, Request A is running immediately after clicking run button, and then the test pause 5000ms (5 seconds), after that Request B will be executed.
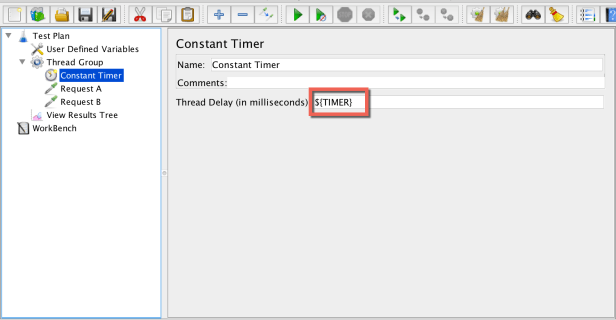
2.3 Parameterized the delay time
You might also don’t want to fix the value for the delay time. It could depend on your test, this time it should be 3 seconds, but next time it should be 5 seconds. And we will parameterize the timer to achieve this.
First, we will create a User Defined Variables and set up a variable, called TIMER or anything else you want.

Next step, call the TIMER variable above by using the syntax ${TIMER}
Now, if you want to change the value of the Timer, the only one place you have to change, it’s the TIMER value in the User Defined Variable.
2.4 Random the delay time
I believe this case is almost cases which you want to do in your test. That is you will input an random value for the Constant Timer instead of a specific value.
You will need the help from a JMeter function __Random.
${__Random(1000,5000,)} –> will return a random value between 1000 and 5000.
Use that function to create the test plan below.


Each time you run this test, it will pause for a random time from 1 second to 5 seconds, before executing Request A. Then it pause for a random time from 1 second to 5 seconds again, before executing Request B.
BUT this way has cons, if we want to apply the Timer for all requests, we must put the Constant Timer under each request, it will take a lot of effort. If you put the Constant Timer in Thread Group level only. It’s will random once, and apply the same value for all requests.
In the next posts of the Timers. I will show you some other useful way to do this. Please follow and read.
