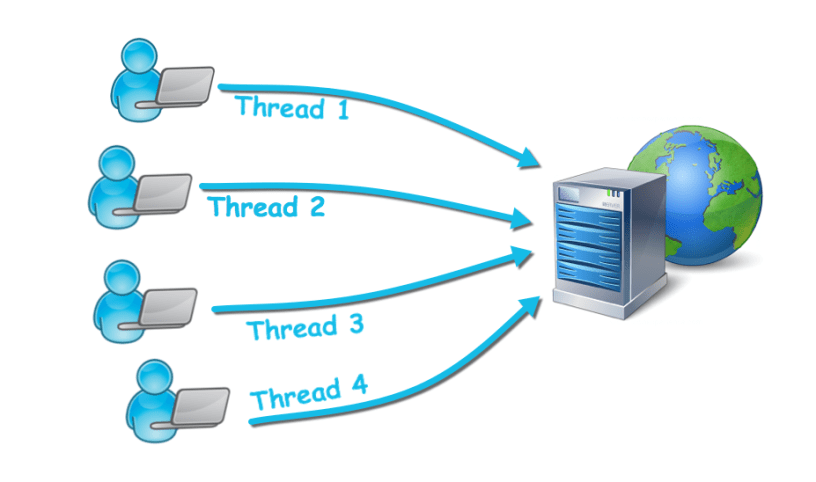
Thread Group elements are the beginning points of any test plan. All Controllers and Samplers must be under a thread group. Other elements, e.g. Listeners, may be placed directly under the test plan, in which case they will apply to all the thread groups. As the name implies, the thread group element controls the number of threads JMeter will use to execute your test.
So the Thread Group element is very important. Usually, you just use some configuration of Thread Group, such as Number of Threads (Users) or Loop Count, sometimes you touched Ramp-Up Period (in seconds). Actually, it’s enough for you to run the test. But the other configurations are also useful and they might help you in some case. Therefore, this post will help you to understand all feature of Thread Group deeply and clearly.
Threads and Loop Count
First, let talk about the Threads and Loop Count. I wanna make sure that you all have a good overview of these definitions.

The illustration above shows the test run of Number of Threads (Users) = 2 and Loop Count = 3. This thread group has only 1 Request A. Assume in this test, two threads are run at the same time. The length of the arrow represents the response time of the request.
Remember, each thread will execute the test plan in its entirety and completely independently of other test threads. They run in parallel after all threads are started. Multiple threads are used to simulate concurrent connections to your server application.
Each Thread Group has their own loop count. The first loop is done, then the second loop will run, and after the second loop ended, the third loop will run, and so on. In other words, the loops run sequentially inside the thread group.
Below is another example to show the test run of Thread Group which has 3 requests Request A, Request B and Request C. Number of Threads (Users) = 2 and Loop Count = 3

1. Action to be taken after a Sampler error

This is the very first options of Thread Group element, but not many people pay attention to it. It determines what happens if a sampler error occurs, either because the sample itself failed or an assertion failed. The possible choices are:
- Continue (default)- ignore the error and continue with the test and run next sampler.

- Start Next Loop – ignore the error, start next loop and continue with the test

- Stop Thread – current thread exits
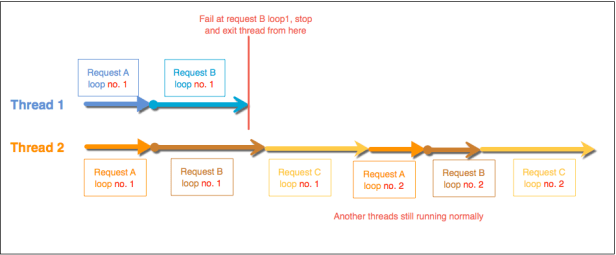
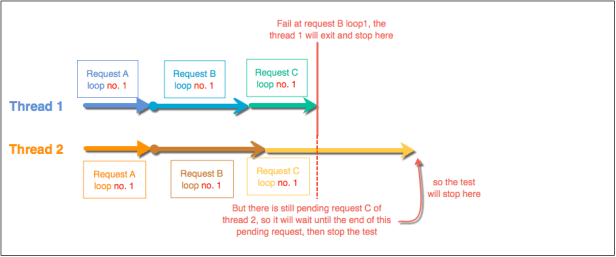
- Stop Test – the entire test is stopped at the end of any current samples. It means the pending samplers are still run until done.
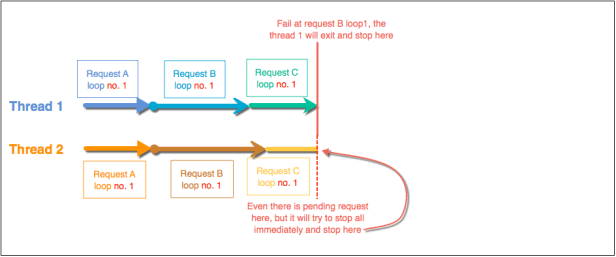
- Stop Test Now – the entire test is stopped immediately. Any current samplers are interrupted if possible.
2. Threads Properties:
The threads properties control the number of threads JMeter will use to execute your test. The controls for a thread group allow you to:
- Set the Number of Threads (Users): Number of users to simulate.
- Set the Ramp-Up Period: The ramp-up period tells JMeter how long to take to “ramp-up” to the full number of threads chosen.If 10 threads are used, and the ramp-up period is 100 seconds, then JMeter will take 100 seconds to get all 10 threads up and running. Each thread will start 10 (100/10) seconds after the previous thread was begun. For example, the test started at 01:48:02, please see the illustration above:

Another example: If there are 30 threads and a ramp-up period of 120 seconds, then each successive thread will be delayed by 4 seconds.Ramp-up needs to be long enough to avoid too large a workload at the start of a test, and short enough that the last threads start running before the first ones finish (unless one wants that to happen).You Should start with Ramp-up = number of threads and adjust up or down as needed.NOTE: If Ramp-up = 0, so the test will be held until all threads were created, then start them all at the same time. - Set the Loop Count – the number of times to execute the test for each thread group. Alternatively, forever can be selected causing the test to run until manually stopped, or until meet the stop condition, such as stop test when has an error, or reach the End Time, run out of the Duration time, etc.If “Loop Forever” checkbox is checked, it means the request will be executed forever for each thread group, until the test has been stopped (by facing the error, reaching the End Time or Duration Time defined in Scheduler Configuration, see section below)By default, the thread group is configured to loop once through its elements.
- Delay Thread creation until needed: If selected, threads are created only when the appropriate proportion of the ramp-up time has elapsed. This is most appropriate for tests with a ramp-up time that is significantly longer than the time to execute a single thread. I.e. where earlier threads finish before later ones start.If not selected, all threads are created when the test starts (they then pause for the appropriate proportion of the ramp-up time). This is the original default and is appropriate for tests where threads are active throughout most of the test.
3. Scheduler Configuration:
Thread Group also provides a scheduler. Click the checkbox at the bottom of the Thread Group panel to enable/disable extra fields in which you can enter the duration of the test, the startup delay, the start and end times of the run.
- Start Time: If the scheduler checkbox is selected, one can choose an absolute start time. When you start your test, JMeter will wait until the specified start time to begin testing. Note: the Startup Delay field over-rides this – see below.
- End Time: If the scheduler checkbox is selected, one can choose an absolute end time. When you start your test, JMeter will wait until the specified start time to begin testing, and it will stop at the specified end time. Note: the Duration field over-rides this – see below.
- Duration (seconds): If the scheduler checkbox is selected, one can choose a relative end time. JMeter will use this to calculate the End Time, and ignore the End Time value. When the test is run out of this time, it will stop and be using mode Stop Test as above
- Startup delay (seconds): If the scheduler checkbox is selected, one can choose a relative startup delay. JMeter will use this to calculate the Start Time, and ignore the Start Time value.
Validation Mode:
This mode enables rapid validation of a Thread Group by running it with 1 thread, 1 iteration, no timers and no Startup delay set to 0.
The 3 first properties can be modified by setting in user.properties:
- testplan_validation.nb_threads_per_thread_group : Number of threads to use to validate a Thread Group, by default 1
- testplan_validation.ignore_timers : Ignore timers when validating the thread group of plan, by default 1
- testplan_validation.number_iterations : Number of iterations to use to validate a Thread Group

Supposed that there are 100 concurrent users logging into the system whereas there are 10 users using the system. So how do we configure settings for JMeter?
LikeLike
Hello Nhu Y,
What kind of action which 10 users are using? I assume they are actions x,y,z. So we can create 2 separate Thread Groups:
First thread group run 100 users and do login into the system.
The second thread group run with 10 users only, and do some actions: x,y,z
Hope this help.
Thanks,
LikeLike
Широкий выбор каминов, каминных печей, изразцов – http://kamin-ignis.com.ua/
LikeLike
Hi Harano1109, as you have mentioned from the Threads & Loop definition, http://prntscr.com/tk0tnr. I think you are missing one loop for this example, or do I understand incorrect your present? I am new and have just started to learn jmeter, Please help me for a while, thanks
LikeLike
Hi Harano1109, as you said “Ramp-up needs to be long enough to avoid too large a workload at the start of a test, and short enough that the last threads start running before the first ones finish ” How do I know the Ramp-up is set long enoudh and short enoud in this case, Please help me. Thanks you so much for your guide and support 🙂
LikeLike
@Harano1109, Please help me for one more question
Set the Loop Count – the number of times to execute the test for each thread group.
As above sentence describes about the loop count, But I still have not understand how is it used in the real world. For example, in the real world: There are 1000 users hit the server at the same time (1000 threads, rampup=1, loopcount=1) but in the different IP address, but in the Jmeter if we simulate 100users in 10times (loop count) with rampup =1
My question is how the result will be different in those 2 senarios?
Does the real world has a loop count thread?
LikeLike