
Part 2: SampleResult, prev, sampler, ctx
Part 3: Parameters, Script File
In general, with all exist features of JMeter and also plugins, we can define the test plan as your requirement. However, it’s not enough, you must write some script to handle the data before/after the sampler running. And the best way to script in JMeter is using JSR223 + Groovy. Now I will post the series of JSR223 with Groovy, they will help you know how to write the script with Groovy language.
When using this feature, ensure your script code does not use JMeter variables directly in script code as caching would only cache first replacement. Instead use script parameters.
Checked Cache compiled script if available is recommended
In the first parts, we will talk about the variables that JMeter support.
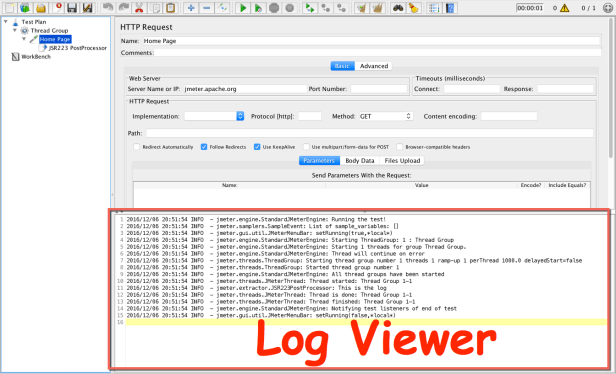
0. Log Viewer
In JMeter, when you run the test, all information (include error information) will be written into the log file. That’s the jmeter.log file in the bin folder. You can also open this log inside the JMeter UI. Let see how can we do that.
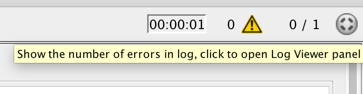
Way 1: Click the status button at top right corner (Yellow triangle with the exclamation mark inside)
Way 2: In the menu bar, go to Options > Log Viewer

UI of Log Viewer:
1. log
It can be used to write to the log file. It’s very useful to debug while we’re scripting the test plan.
Syntax:
log.info("Your message here");
or just use
log.info "Your message here"
Example 1: (Download here) Create JSR223 PostProcessor under an HTTP Request or any Sampler
log.info("This is the message 1 from log.info");
log.info "This is the message 2 from log.info"
Run the test and see the result

Example 2: (Download here) You can write log with the variable, and also combine text and variable as the other language
def text = "Groovy";

log.info(text);
log.info("The best bundle for scripting in JMeter is JSR223 and " + text);
Run the test and see the result

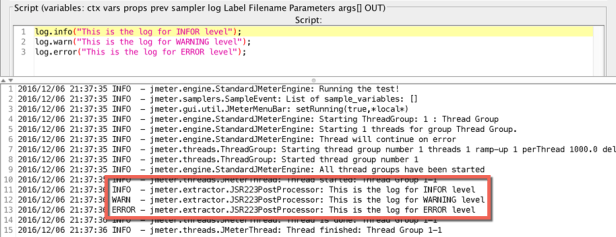
There are 3 levels of the log: INFO, ERROR, and WARNING. Base on the need you can use the corresponding level of the log.
Example 3: (Download here) Run the script below
log.info("This is the log for INFOR level");
log.warn("This is the log for WARNING level");
log.error("This is the log for ERROR level");
Run and see the result
Note: When we have any log with error level, the triangle status in the top right corner will be increase 1.
2. OUT
Print out the message in console.
When you start the JMeter from jmeter.bat (Windows) or jmeter (Linux) or jmeter.sh (Mac), you will see the console. And if you want to write the log here during debug time, you can use the OUT command.
It works the same log command, just difference place to show the message.
Syntax:
OUT.println "INPUT MESSAGE HERE"
//or
OUT.println("INPUT MESSAGE HERE");
Example 4: (Download here) Try to print 2 message as syntax above to the console using OUT command
OUT.println "This message comes from OUT command"
OUT.println("This is the other message comes from OUT command");

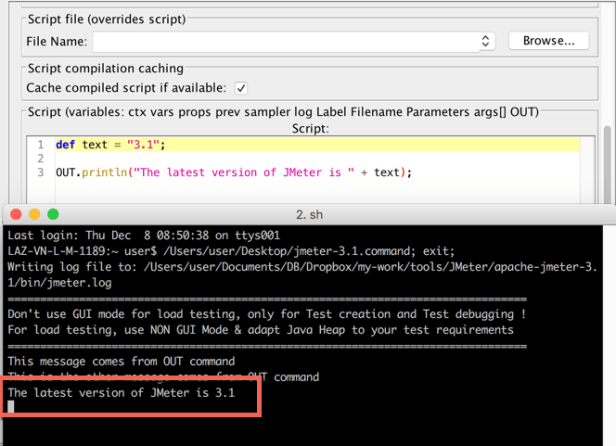
Example 5: (Download here) The same as log, we can print the variable
def text = "3.1";

OUT.println("The latest version of JMeter is " + text);
Note: With Groovy, we can print the log into the console without OUT. Just use println is enough.

3. vars
3.1 Gives read/write access to variables.
How to read/get the variable:
vars.get("VARIABLE_NAME");
How to write/set the variable:
vars.put("VARIABLE_NAME","VALUE");
NOTE: The value must be String type to put into the JMeter variable
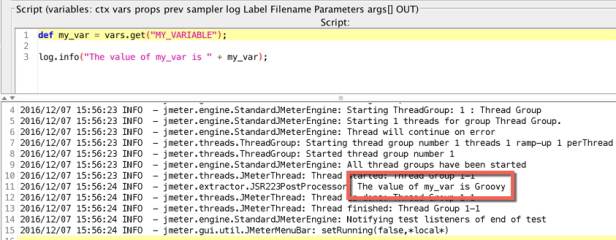
Example 6: (Download here) we have the variable MY_VARIABLE=Groovy from User Defined Variable or just extract from the response data using Regex Extractor or JSON Extractor. And now you would like to get that variable to do something in JSR223. Let see how to do this
def my_var = vars.get("MY_VARIABLE");

log.info("The value of my_var is " + my_var);
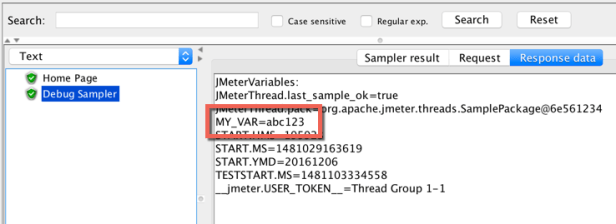
Example 7: (Download here) I will use vars.put to create a variable from JSR223 + Groovy, then run and use Debug Sampler to see what we have
vars.put("MY_VAR","abc123");
Example 8: (Download here) We can put the raw value into the variable as Example 7, or we can also put the other variable inside JSR223 into the new variable. Let see this:
def text = "xyz456";

vars.put("MY_TEXT", text);

After that, you can use ${MY_TEXT} to call that variable anywhere, it will retun the value xyz456
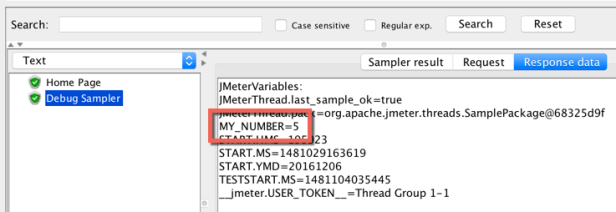
Example 9: (Download here) We can also get the variable, then do something, and put the new value after editing into that variable again.
In this example, I create a variable MY_NUMBER=2 in User Defined Variable, then I will get this variable and do some math with it, and put it into MY_NUMBER again
def my_number = vars.get("MY_NUMBER").toInteger(); //convert to int type
def new_number = 3;

def add = my_number + new_number;

vars.put("MY_NUMBER", add.toString());
As the note above, the variable add is Int type, so it must be convert to String before put into variable MY_NUMBER
3.2 Gives read/write access to an object, array.
How to read/write access to an object
vars.getObject("OBJECT_NAME");
vars.putObject("OBJECT_NAME");
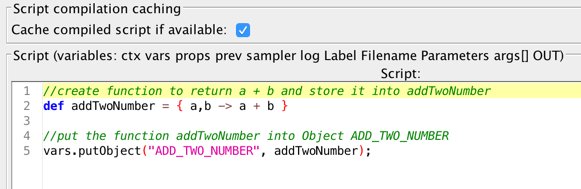
Example 10: (Download here) I will create a simple function, to calculate the sum of two number in a JSR223, then put it into a JMeter Object, and call it from other JSR223, use that object to calculate the result. Let see:
Script in JSR223 1: Create and put function into an Object
//create function to return a + b and store it into addTwoNumber
def addTwoNumber = { a,b -> a + b }

//put the function addTwoNumber into Object ADD_TWO_NUMBER
vars.putObject("ADD_TWO_NUMBER", addTwoNumber);
Script in JSR223 2: Get the Object and use it
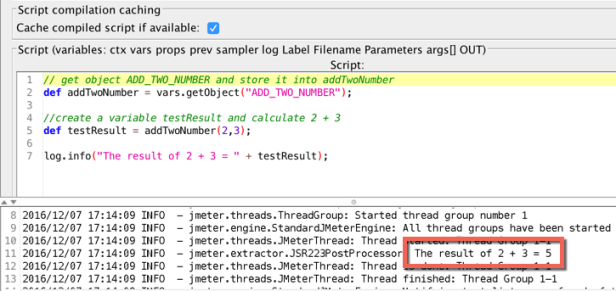
// get object ADD_TWO_NUMBER and store it into addTwoNumber
def addTwoNumber = vars.getObject("ADD_TWO_NUMBER");

//create a variable testResult and calculate 2 + 3
def testResult = addTwoNumber(2,3);

log.info("The result of 2 + 3 = " + testResult);
Run and see the result
4. props
4.1 Definition: It’s the same as vars but it’s used for JMeter Properties. Please see the table below to know what is the difference between vars and props
| vars | props |
|---|---|
| Use for JMeter Variables | Use for JMeter Properties |
| Can read/write on single Thread Group | Can read/write on multi Thread Group |
Use getObject and putObject to get access to an Object, List, etc. |
props is an object of type java.util.Properties, which is a subclass of Hashtable. Therefore you can use put and get to access Object, List, etc. |
4.2 How to view JMeter Properties:
There are some ways to view all the current JMeter Properties
Way 1: Refer the link Properties Reference
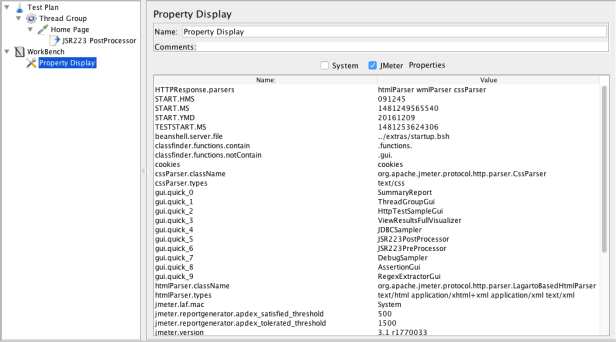
Way 2: In JMeter GUI mode, under WorkBench, create Property Display by
WorkBench > Add > Non-Test Elements > Property Display.
Then select JMeter Properties checkbox to view all the exist properties
Way 3: Use Debug Sampler and change JMeter properties to True.

Run and view all JMeter Properties in the Response Data of View Result Tree.

4.3 How to read/write the properties:
props.get("PROPERTY_NAME");
props.put("PROPERTY_NAME", "VALUE");
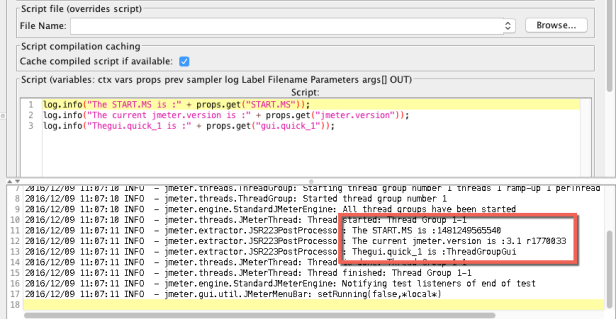
Example 11: (Download here) Let get the value of some properties: START.MS, jmeter.version, and gui.quick_1 (this is the property which I mention in post How to undo/redo in JMeter)
log.info("The START.MS is " + props.get("START.MS"));
log.info("The current jmeter.version is " + props.get("jmeter.version"));
log.info("Thegui.quick_1 is " + props.get("gui.quick_1"));
Example 12: (Download here) We can use put to create new properties or update the existed properties as well
//create new property
props.put("MY_PROP","ABCD1234")
//update the existed property
props.put("jmeter.version","3.1")
Use Debug Sampler with JMeter Properties = True, run and see what we have
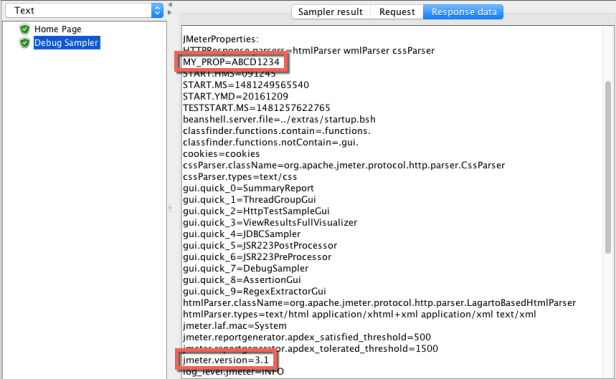
After that, you can use ${__P(MY_PROP)} to call that property anywhere, it will return the value ABCD1234
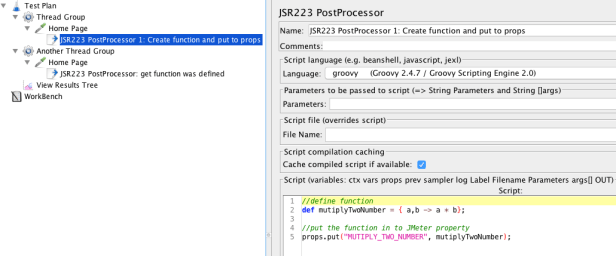
Example 13: (Download here) As said above, props is subclass of Hastable, therefore we can use put to store Object, List, Map, etc. In this example, I will create a function in a Thread Group, then call it in the other Thread Group.
Script in the first Thread Group:
//define function
def mutiplyTwoNumber = { a,b -> a * b};

//put the function in to JMeter property
props.put("MUTIPLY_TWO_NUMBER", mutiplyTwoNumber);
And the script in the second Thread Group:
//call the function from property (in another Thread Group
def multiplyTwoNumber = props.get("MUTIPLY_TWO_NUMBER");

//check the function to see how it work
def testResult = multiplyTwoNumber(4,5);

//print the log, it should see the value 20
log.info("The result of 4 * 5 = " + testResult);

Let run to see the props can share the value cross Thread Group

All the example file can be downloaded here:
Example 1: Download here
Example 2: Download here
Example 3: Download here
Example 4: Download here
Example 5: Download here
Example 6: Download here
Example 7: Download here
Example 8: Download here
Example 9: Download here
Example 10: Download here
Example 11: Download here
Example 12: Download here
Example 13: Download here
Or download all-in-one folder here.
Part 2: SampleResult, prev, sampler, ctx
Part 3: Parameters, Script File

Impressive 🙂
LikeLike
Very good articulation. Thanks for the help.
LikeLiked by 1 person
Exactly What I needed. Thank you Boss.
LikeLiked by 1 person
thank you for your goos feedback schanjr
LikeLike
How to use groovy for functionality validations of a web page ? is it possible to capture and validate elements/object via groovy ?
LikeLike
Yes it’s possible to do almost thing with Groovy.
LikeLike
Informative
LikeLike
Do you have more article related to Groovy in jmeter?
LikeLike
Very very useful !!!
LikeLike