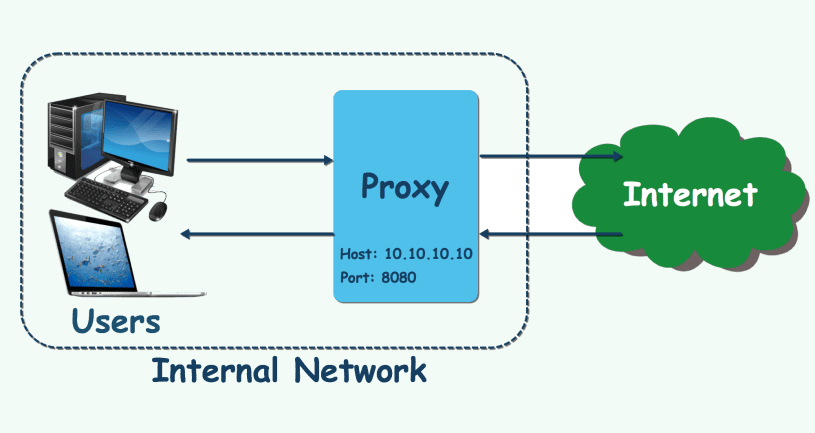
If your company use the proxy, so you might get some problem while working with JMeter. The normal browser can access the website normally but JMeter. So why, and how to fix this, please read this post to find out the answer.
0. Preparation
I created a Proxy Server on my local computer with
Host: localhost (127.0.0.1)
Port: 8888
And I don’t use the Username and Password for authentication.
Then I created a basic test plan like the image below, it consists of 1 HTTP Request Defaults and 1 HTTP Request which will access to the site jmeter.apache.org
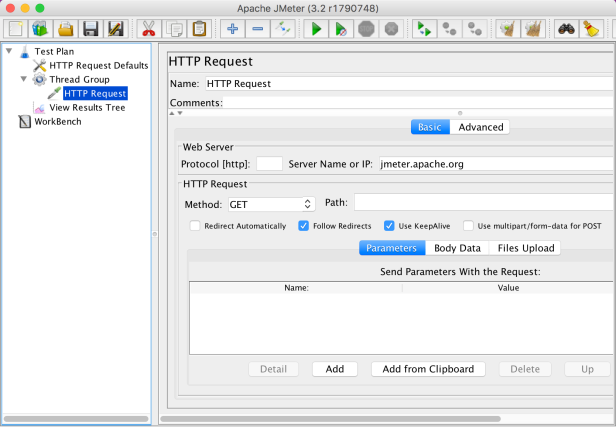
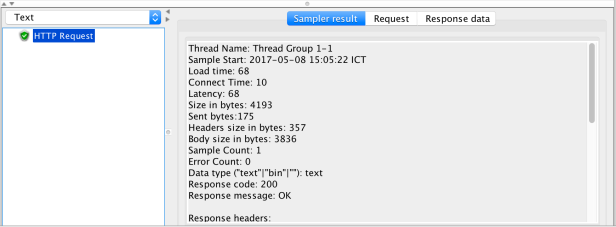
If I don’t config anything and run the Test Plan above, you will see the similar error like this:
java.net.ConnectException: Connection refused (Connection refused)
       at java.net.PlainSocketImpl.socketConnect(Native Method)
       at java.net.AbstractPlainSocketImpl.doConnect(AbstractPlainSocketImpl.java:350)
       at java.net.AbstractPlainSocketImpl.connectToAddress(AbstractPlainSocketImpl.java:206)
       at java.net.AbstractPlainSocketImpl.connect(AbstractPlainSocketImpl.java:188)
       at java.net.SocksSocketImpl.connect(SocksSocketImpl.java:392)
       at java.net.Socket.connect(Socket.java:589)
       ...
Now, here we go. There are at least four ways to run JMeter behind the Proxy. Base on what you need and what you want, to use the appropriate way.
1. Way 1
–> Config the Proxy Server into each HTTP Request.
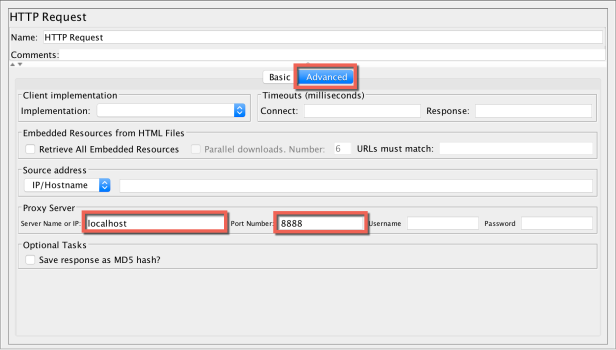
In the HTTP Request, you can find out the Proxy Server section in the bottom of HTTP Request element, from version 3.2, you’ll find it out in the Advance tab of HTTP Request.
Now, input the information of Proxy Server into this section. In my example, because I’m using the Proxy Server with Host localhost(127.0.0.1), Port 8888 and don’t use username/password. So I will input this information like image below
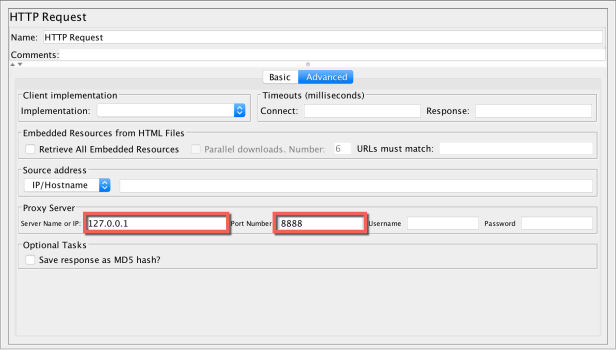
If the Proxy Server doesn’t have the hostname like localhost and has IP only, so we will input that IP into Server Name or IP field.
NOTE: If your proxy required username/password, please input them into the corresponding field Username and Password.
Run the test again, everything should be ok now.
2. Way 2
–> Config the Proxy Server into HTTP Request Defaults.
Imagine, if you have many requests, 100 requests for example, and you’re using the way 1, so you must input 100 times into those 100 requests, that’s not a good idea, right? And in case the Proxy Server is changed, you have to change in those 100 requests. So the idea is to config the Proxy Server into HTTP Request Default.
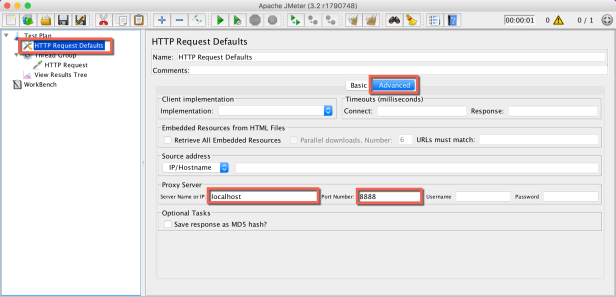
We will not input anything into the HTTP Requests, just open HTTP Request Defaults, find out the Proxy Server, and do the following:
Use the Proxy host and port
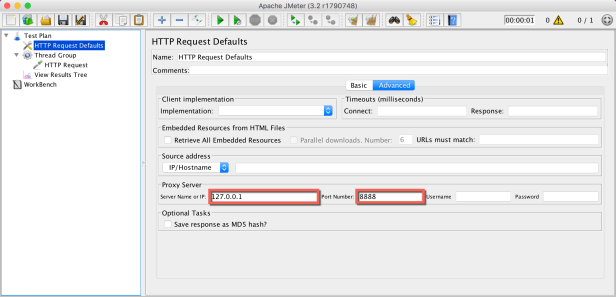
or use the Proxy IP and Port
NOTE: If your proxy required username/password, please input them into the corresponding field Username and Password.
Run the test again, everything should be ok now.
3. Way 3
–> Launch JMeter from the command line with the following parameters:
- -H
- [proxy server hostname or IP address]
- -P
- [proxy server port]
- -N
- [nonproxy hosts] (e.g. *.apache.org|localhost)
- -u
- [username for proxy authentication – if required]
- -a
- [password for proxy authentication – if required]
Example: Go to $JMETER_HOME/bin folder and run the command below
Windows:
jmeter -H localhost -P 8888
Or you can use the IP instead of Server name
jmeter -H 127.0.0.1 -P 8888
If your Proxy Server required username and password, use the command below
jmeter -H localhost -P 8888 -u username -a password
If a non-proxy host list is provided, use this command
jmeter -H localhost -P 8888 -u username -a password -N localhost
MAC:
./jmeter.sh -H localhost -P 8888
or
./jmeter.sh -H 127.0.0.1 -P 8888
or (if required username/password)
./jmeter.sh -H localhost -P 8888 -u username -a password
or (if the non-proxy host is provided)
./jmeter.sh -H localhost -P 8888 -u username -a password -N localhost
NOTE: You can also use –proxyHost, –proxyPort, –username, and –password as parameter names
Example:
jmeter --proxyHost localhost --proxyPort 8888
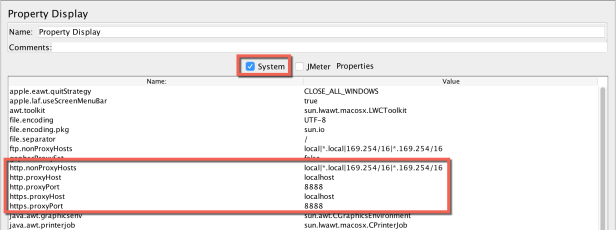
After launching by this way, you can check the Proxy Server in JMeter by:
- Right click WorkBench, select Add > Non-Test Elements > Property Display

– Check the checkbox System, and see the information related to Proxy, it should display the information of the Proxy Server which we launched from the command line above
Now, the JMeter is running behind the proxy, and you can run the test plan without any other configuration. It should run normally
P/S: You can use this way, to run the normal Test Plan with specific proxy
Example:
Window:
jmeter -n -H localhost -P 8888 -t C:\jmeter\my-test-plan.jmx -l C:\jmeter\my-test-plan-result.jtl -j C:\jmeter\my-test-plan-result.log
MAC:
./jmeter.sh -n -H localhost -P 8888 -t C:\jmeter\my-test-plan.jmx -l C:\jmeter\my-test-plan-result.jtl -j C:\jmeter\my-test-plan-result.log
4. Way 4
–> Set the Proxy properties into the System properties file.
- Open the
system.propertiesin edit mode, this file is located under/JMeter/bin/directory - Add the following properties to the end of file
http.proxyHost
http.proxyPort
https.proxyHost
https.proxyPort
Example: I will config the properties above into system.properties file with my Proxy Server
http.proxyHost=localhost
http.proxyPort=8888
https.proxyHost=localhost
https.proxyPort=8888
If a non-proxy host list is provided, then JMeter sets the following System properties:
http.nonProxyHosts
https.nonProxyHosts
Example:
http.proxyHost=localhost
http.proxyPort=8888
https.proxyHost=localhost
https.proxyPort=8888
http.nonProxyHosts=example.com
https.nonProxyHosts=example.com
Open the JMeter, and try to check the System Properties as described in the way 3, you should see the information like below:
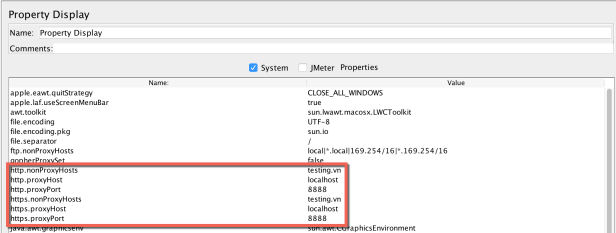
Now you can define and run your test plan normally without any other configuration.

What is we are master slave configuration then how to set same proxy servers in slave system.
LikeLike
It’s a good question Raman. The solution is very easy, you can use way3 or way4. And I prefer eay3. You can launch the jmeter-server by command line and pass the option to force jmeter using proxy as you want. If you face any problem while trying this. Let me know then.
LikeLike
Correction: What if we are using master slave configuration then how to set same proxy server setting in slave systems
LikeLike
Internet option settings>Connections>LAN Settings>Proxy server is hard coded with company proxy and no access to edit it. Is there any other way to point my browser to Jmeter’s HTTP(S) Test Script Recorder proxy for recording? Is there any way Jmeter can listen to my company proxy and record the HTTP Requests?
Chrome Extension(Blazemeter) is not an option for me.
LikeLike
Firslty thanks for sharing a detailed post with screenshots
how can we run Jmeter behind a corporate proxy? like the ones configured with a .PAC file`? I tried several options but could not make it to work
example:
http://pacscript.org.compnay.com/redirectpac.aspx is in the LAN Settings>>Automatic Configuration script address
All other settings I have followed Way 2
Best,
MKC
LikeLike
Very Nice Article.
Regards,
Anil
LikeLike
How to use this with Jmeter 5.3 ?
LikeLike
so much helpful
LikeLike